Did you decide to purchase NordVPN? Do you wonder: How Do I Use NordVPN With Utorrent?
In this article we will show you step by step how to make a purchase of new NordVPN subscription, set up account and start using NordVPN software! After guide we will answer some questions regarding using an VPN app.
Table of Contents
Here is how to purchase a NordVPN subscription
- Start by visiting NordVPN website, you can click here.
- Click on pricing tab at the top of the page, here you can see current plans, pricing and deals. Choose which NordVPN plan you prefer to purchase and then click “Get *name of the plan* button.
You can choose between standard plan (pure NordVPN service) or other plans that comes with NordPass or NordLocker services.
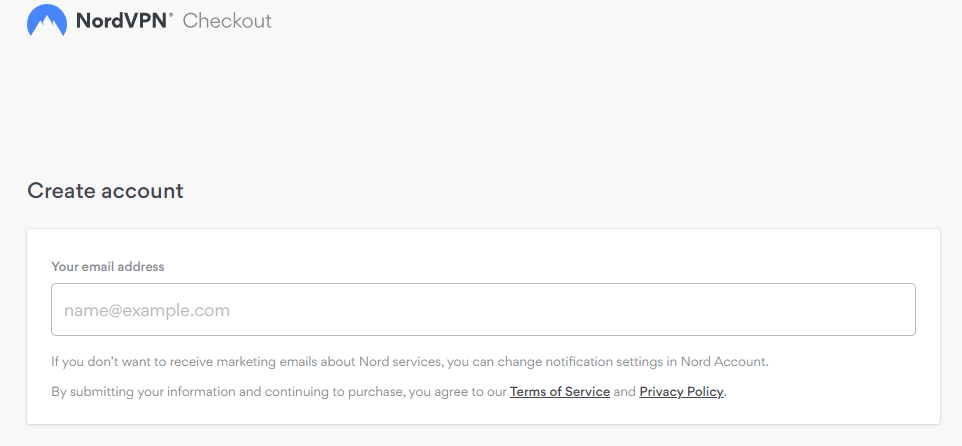
- Now you have to type your email adress that you will be using NordVPN with.
- Now you have to choose payment method which you want to use, and proceed with it.
- Well done! If you followed this guide nicely you purchased NordVPN subscription! Look at your email inbox, here you will find purchase confirmation email.
Now download NordVPN APP and start using it
After purchasing your VPN plan, head to this page to download the NordVPN app
Now you can click start and enjoy using VPN!
Click here to get the Best NordVPN Deal! 🔥Let’s get back to main question, How Do I Use NordVPN With Utorrent?
Open your uTorrent client and click “Options.” Select “Preferences” from the drop-down menu.
In the left sidebar menu of the pop-up window, click “Connection.”
Under the Proxy Server section, choose “Socks5” in the “Type” drop-down menu.
In the “Proxy” field, enter the IP address of the NordVPN server you want to connect to. You can find a list of NordVPN servers here.
In the “Port” field, enter 1080.
Leave the “Authentication” fields blank.
Click “OK” to save your changes and close the window.
Now, when you connect to NordVPN, your uTorrent traffic will be routed through the selected proxy server.
Worth knowing
The first thing you need to do is sign up for a good quality Socks5 proxy service. We recommend using Private Internet Access, which offers both reliable proxies and excellent privacy protections. Once you’ve signed up for an account, head over to the Proxy tab in the Preferences window of uTorrent.
In the Proxy settings window, select the Type as SOCKS5 from the drop-down menu and enter the proxy server address in the Hostname field. Make sure to also enter the port number provided by your proxy service in the Port field. Finally, check the box next to Authentication if your proxy requires it and enter your username and password in the appropriate fields.
Click OK when you’re done and uTorrent will now use your Socks5 proxy for all future downloads!
Worth knowing
This can be useful for several reasons. First, it can help you stay anonymous online. If you’re worried about someone tracking your activity, using a VPN can make it much harder for them to do so. Second, it can allow you to access websites and content that may be blocked in your country. And third, it can help improve your internet speeds by bypassing throttling from your ISP.
If you want to use a VPN with uTorrent, there are a few things you need to know first. First off, not all VPN providers allow torrenting on their servers. So make sure to check before signing up! Second, even if a provider does allow torrenting, they may limit your speeds or bandwidth if they think you’re abusing their service.
Finally, always remember to use caution when downloading copyrighted material. While many countries have laws that decriminalize non-commercial copyright infringement, some do not. So if you’re unsure about the legal status of what you’re downloading, it’s always best to err on the side of caution and refrain from doing so altogether!
Worth knowing
Let’s look at each of these steps in more detail:
1) Make sure your VPN support OpenVPN protocol: In order for this method to work, you’ll need a VPN that offers support for the OpenVPN protocol. Not all VPN providers offer this so be sure to check before signing up. If you’re not sure which protocol your provider uses, contact their customer support team and they should be able to tell you.
2) Download & Install OpenVPN GUI: Once you’ve confirmed that your chosen VPN uses the OpenVPN protocol, head over to theOpenVPN website and download the latest version of their software (this guide will use version 2.3). Once downloaded, run through the installation process – it should be pretty straightforward.
3) Connect To Your VPN Using The OpenVPN GUI: With both your VPN account details and the software ready to go, it’s time connect! Launch theOpenVPN GUI application and click ‘Add Profile…’ located under File onthe toolbar (First screenshot). Select ‘Import file…’ from next menu that appears(Second screenshot). Now browse for where you saved .ovpn configurationfile earlier on from Step 1 (Third screenshot), select it then clickOpen followed by OK Import Profile Window Location of OVNconfiguration file
You should now see something similar 4) Bind uTorrent To Your IP Address: The final step is bindinguTorrent traffic exclusively to our newly created tunnel device which hasour chosen IP address. This ensures that only encrypted traffic passthrough our tunnel while leaving other unneeded traffic such as DNSrequests etc outside of it saving us both time and bandwidth! To do thissimply open uTorrent then goto Options > Preferences > Connection(screenshot below). Under ‘Listening Port’ enter in a port number betweenthousand five hundred sixty one – six thousand five hundred sixty fourthat isn’t being used by any other program on computer Then checkmarkboth box options next 5) All Done!: That completes everything! Aslong we have our Green Lock icon next TO indicating that connectionis established means we are good 6) Bonus Tip: For extra pieceof mind or if torrenting high risk copyrighted materials its worthchanging encryption cipher settings within both utorrent clientpreferences AND login into ovpn gui app 7) enjoy yourself &stay safe out there
![Is NordVPN Blocked On Amazon? [NordVPN Beginner Guide]](wp-content/themes/blogstream/img/thumb-medium.png)